Notifications, Shortcuts & Triggers
Learn how to deliver smart notifications to your iOS devices.
Defining notifications

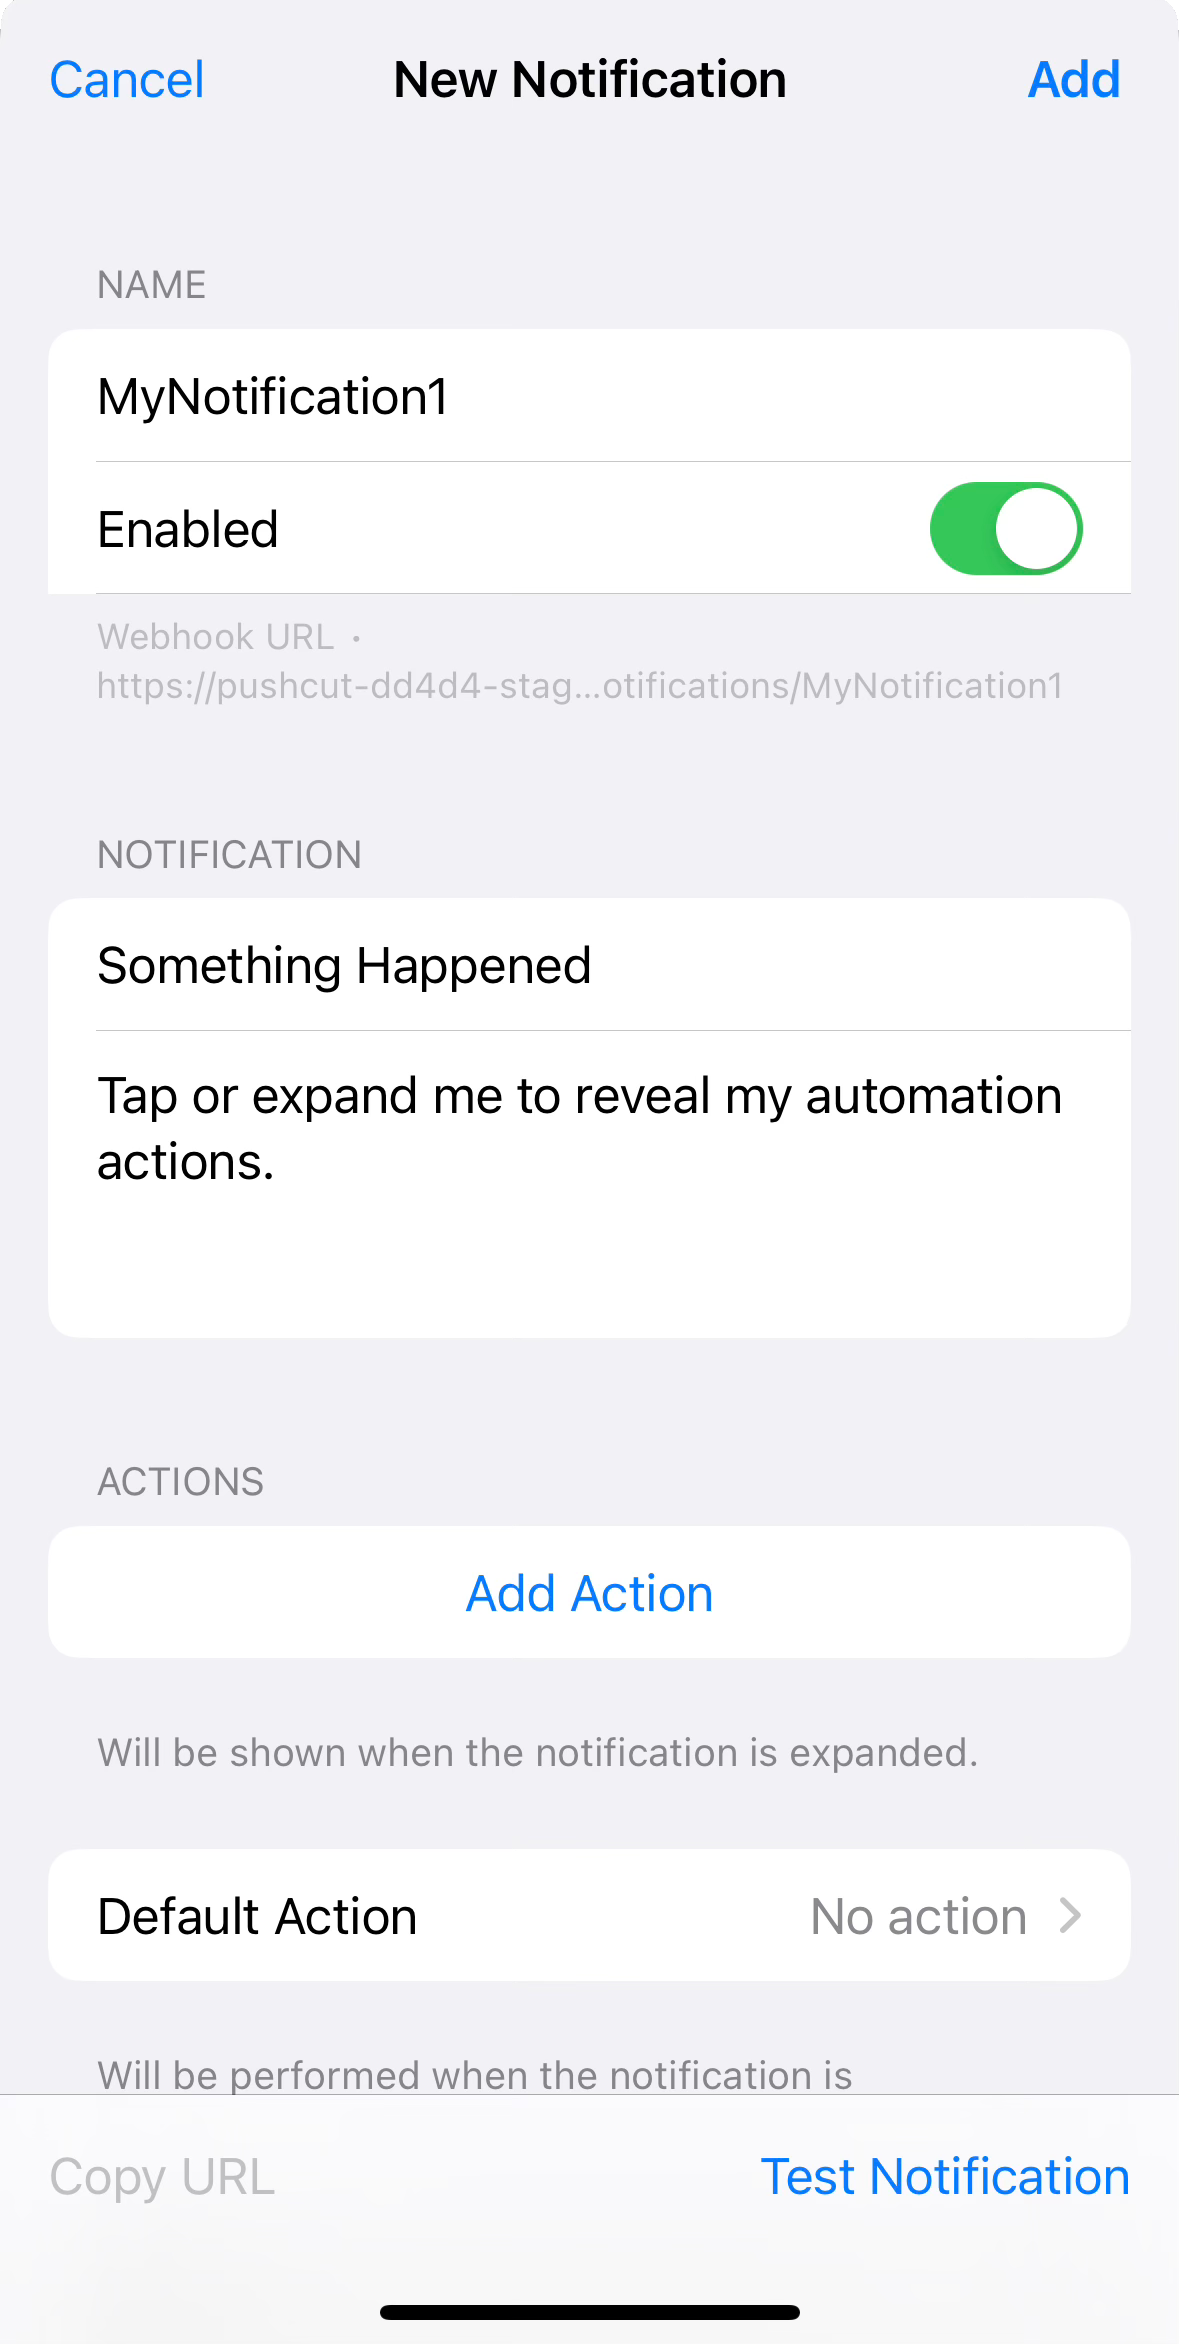
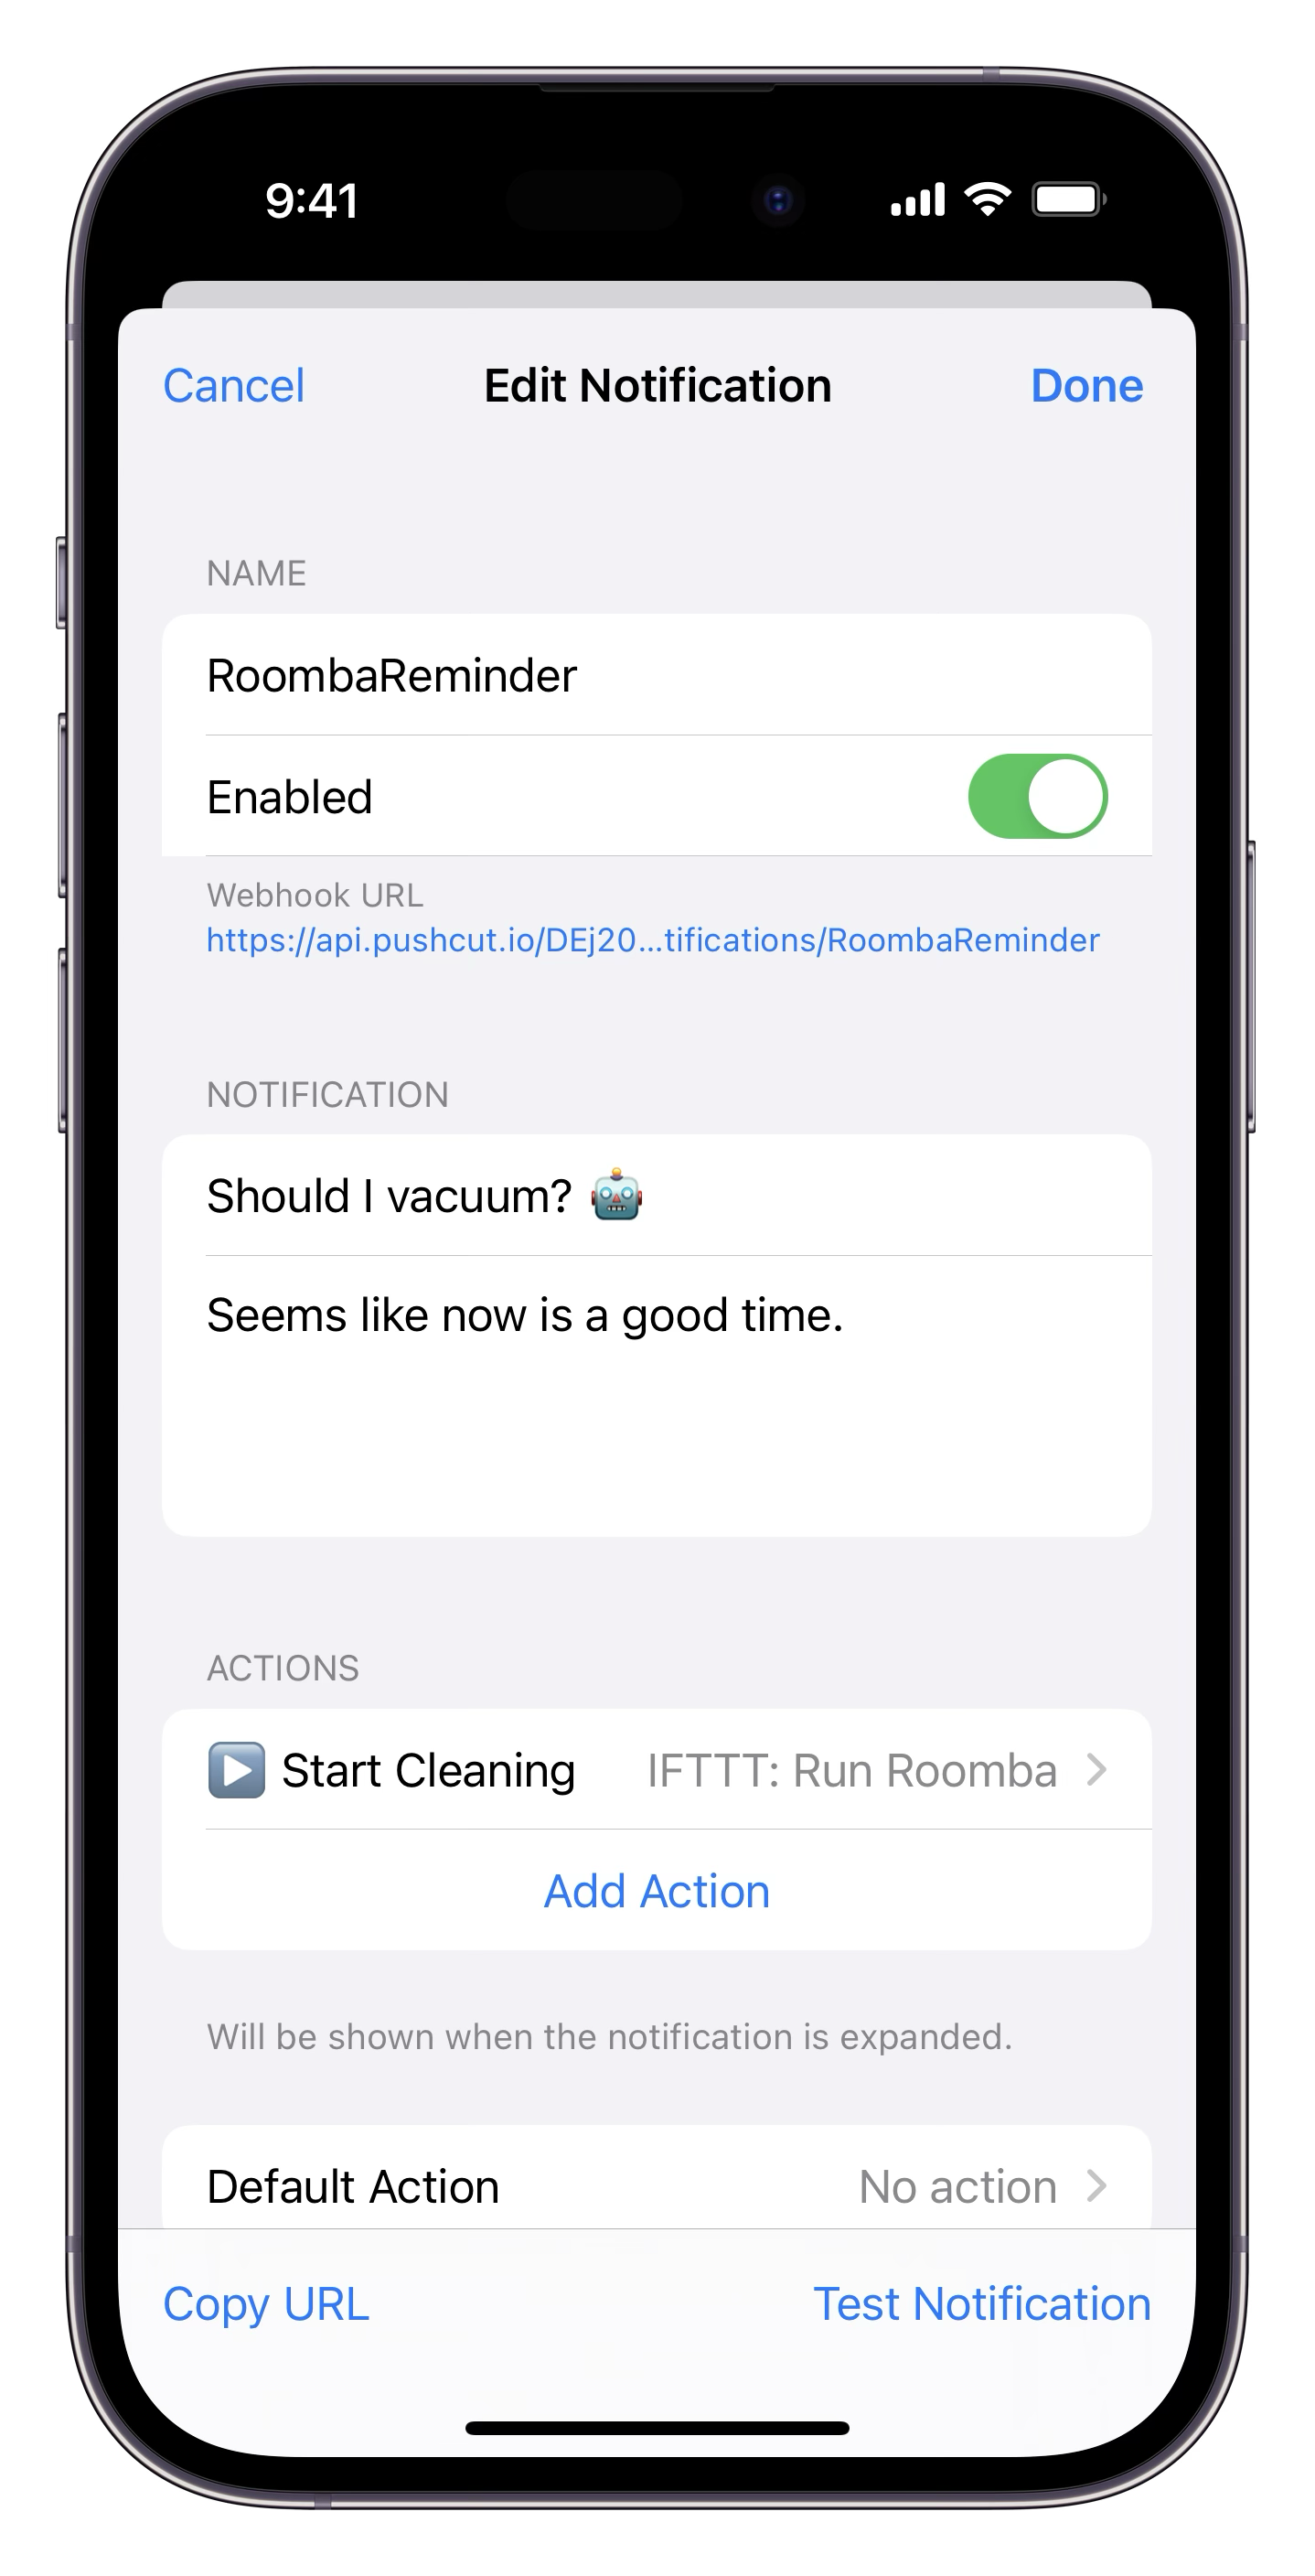
Use the Add Notification view (notification editor) in the app to define notifications as you want to see them. You can set your own notification title and body text, and give it a unique name that is used to create a URL. You can also select a distinct sound from a list for each notification.
Now make your notification smart by adding one or several automation actions.
Everytime you trigger a notification this information will be shown to you as a plain iOS notification on all your devices.
You can test your notification (even before saving) by tapping Test Notification. This happens locally on your device.
Shortcuts
If you have the Shortcuts app installed, you can import all your shortcuts into Pushcut using the Shortcuts view. Only the names of the shortcuts are actually transferred over. Using the notification editor, you can add multiple shortcuts as actions to your notification.
If you are running an Automation Server, you can run your shortcuts as server actions without user interaction.
Importing shortcuts
The first time you run Import Shortcuts, a shortcut is installed called Export for Pushcut. The Shortcuts app will ask for your permission to download and run it only the first time.
"Export for Pushcut" Can't Be Opened: Since iOS 13 any shortcut from an external link is considered "untrusted" by Apple. If you get this error, please go to Settings -> Shortcuts and check Allow Untrusted Shortcuts. You only need to do this once.
You can run Import Shortcuts whenever shortcuts have been added, renamed, or removed. You can find it through the Notifications tab, tap the ... menu entry called Shortcuts and then tap on the import icon in the top right to update your Shortcuts. The Pushcut app will update its
list and highlight shortcuts that your notifications use but are no longer available.
If you accidentally delete the Export for Pushcut shortcut, the Pushcut app will detect it and attempt to download it again (tap Import shortcuts a second time).
Actions

Each notification action is identified by a name and runs either a shortcut, a URL or web request , a server action, or a HomeKit scene.
Actions are displayed when you expand a Pushcut notification on your device (swipe down on the banner or 3D touch/long press in Notification Center). Tapping an action will execute the associated automation. Empty actions will just dismiss or close the notification.
If you have an Apple Watch paired, an interactive notification interface will show all actions that are supported on watchOS. Please note that opening Safari, Shortcuts, or other apps is not supported on Apple Watch. However, server actions, web requests and HomeKit scenes can be executed directly from your wrist.
By default, executing an action will dismiss the notification. If you enable Keep Notification in the action editor, the notification will stay in Notification Center until dismissed by another action or the Dismiss button. This way you can run multiple actions from one notification. The default action always dismisses the notification.
Web requests and server actions can also be run from background triggers.
Default action
You can define an optional default action for each notification. It will run when you tap the notification directly ( without expanding). Alternatively, you can run the default action by tapping the content area in an expanded notification.
If you do not set a default action, tapping the notification will open a representation in the Pushcut app.
URLs
Many iOS applications define custom URL schemes or offer Universal Links to support automation ("deep links"). URLs
always follow the scheme://path pattern, so they are easy to recognize.
It is also possible to open regular websites (like https://www.pushcut.io). Unless an app has the web URL registered as
a univeral link, Safari will open the website directly. (be sure to include http:// or https://)
You can use the JSON API to attach generated URLs to actions dynamically.
Examples
| URL | Action | Kind |
|---|---|---|
| https://www.pushcut.io | Opens the Pushcut website in Safari | Web |
| https://twitter.com/pushcut_app | Opens @pushcut_app in the twitter app if it is installed | Universal |
| https://drive.google.com/drive/u/0/folders/ | Opens a folder in the Google Drive app if it is installed | Universal |
| omnifocus:///add?name=Task%20from%20Pushcut | Adds a new task in OmniFocus | Custom scheme |
| due:///add?title=Reminder%20from%20Pushcut | Adds a new reminder in Due | Custom scheme |
Web Requests
For http/https URLs you can enable Background Request to perform a web request instead of opening the link in Safari. The request editor lets you select details like method (GET, PUT, POST) and content type. You can pass the Input parameter in the body and URL.
This is perfect for triggering IFTTT maker webhooks, custom web services, or DIY home server APIs without opening any other app.
Web Requests can also be triggered automatically as background actions.
Server actions
Pushcut can trigger shortcuts and HomeKit scenes as server actions on your own Automation Server. This can happen completely in the background, even from location triggers or your watch.
In addition, you can connect integrations and online services to run server actions directly in the cloud - without opening any other app. These integration triggers will automatically appear once you activate a Pushcut trigger in your Applet, Zap, Flow, or Scenario.
Triggering a notification
Pushcut notifications can be triggered in a variety of ways, here is quick overview. If you are looking to trigger shortcuts directly, check out the Automation Server.
| Locations | Use the Local Triggers feature for flexible triggers based on geofences or beacons. |
| Scheduled | Use the Local Triggers feature for daily, weekly, or monthly schedules. |
| Shortcuts | Use the shortcut actions to schedule smart notifications dynamically from your own shortcuts. |
| Integrations | Connect Pushcut to online services like IFTTT, Zapier, and Make. |
| HomeKit | Use the Get contents of URL action in a HomeKit shortcut automation to send smart notifications through the Pushcut webhook. (See HomeKit guide) |
| Anything else | Use the Web API to include Pushcut into your DIY automation setup. |
Shortcuts Actions
Pushcut comes with a list of actions for Shortcuts to schedule and send notifications and server actions (iOS 13 or higher required).
Use Show Notification or Schedule Shortcut to schedule local Pushcut notifications. Select a time or a location event as the trigger, and pass in dynamic text, title, and input parameters. Much like Local Triggers these notifications are scheduled on your device (ie: they do not invoke the webhook or other devices). You can review all scheduled notifications in the Pushcut app under Local Triggers -> Pending. If you set the Identifier parameter, you can cancel (Cancel Notification) or override a previously scheduled notification from another shortcut.
Use Send Notification to send Pushcut notifications to your other devices instantly. You can optionally set title, text, and input from variables, or pass in a fullly dynamic JSON configuration.
Use Execute Server Action to dynamically schedule shortcuts or HomeKit scenes to run on your Automation Server.
Webhook URL
For the most versatile notification triggers, Pushcut offers an HTTP webhook that allows you to trigger your notifications by sending a POST or GET request to a secret, unique URL.
The simplest way to test the webhook URL is probably by opening it in any web browser. The browser will send a GET request every time you load or refresh the page. While this will work just fine, be aware that the URL will be saved in the browser history. Make sure you are in an environment you trust before you enter your URL anywhere.
You can copy the URL by tapping Copy URL (or the URL cell) in the app. There is also an option to copy a curl statement. The command line utility curl runs on most servers as well as Macs and PCs - simply execute the statement on the command line to trigger your notification.
Tip: Use Apple's Universal Clipboard feature to paste your copied curl statement directly on your Mac.
Use the share feature to transfer the URL and curl statement into another app (like a mail or notes app). Do not share or send your URL anywhere it can be accessed by others!
Secret
Your account comes with a secret that is used to create a URL only known to you. Anyone with this secret can push notifications to your devices, or even execute server actions. Do not share this or store it where it can by accessed by others.
If you believe somebody else has access to your secret you can use the Generate new secret feature in the Account page of the app. This will assign a new unique secret and invalidate all previously used URLs. Old URLs will no longer work - this operation is not reversible.
An account can only have one active secret. You can, however, create several API-Keys and revoke them individually.
Local Triggers
For time or location-based notifications, you can define Local Triggers in the Pushcut app directly. These are kept on-device, which means they work even when offline and do not sync to other devices connected to your account.
You can easily add local triggers inside the notification editor, or see a list of all local triggers in the separate Local Triggers view. For now, the following triggers are supported: daily, weekly (days of the week), monthly, on arrival, on departure.
Locations can be defined as a circular region on a map, or by using an iBeacon signal. For technical reasons, the minumum radius for map regions is 100 meters.
It is possible to combine location and time in the form of constraints. A time-based trigger with a location constraint will only trigger while at (or not at) a configured location. Likewise, a location trigger will only fire within the specified time frame. For location triggers, you can additionally define Do not repeat and Delay notification durations.
Background Actions
Location triggers can also be used to execute server actions and web requests directly without showing a notification. Use the Background section in the Local Triggers view to define background actions.
Webhook
Trigger notifications by sending a plain HTTP POST or GET request
to https://api.pushcut.io/[secret]/notifications/[notification-name]
This will trigger the notification identified by notification-name on all devices linked to the account identified
by secret. If everything goes well, you will get a nice 200 OK response code.
If the either secret or notification-name is wrong, you will get a 404 Not Found code with an error message like
{
  "error": "Invalid notification name."
}
Reference IDs
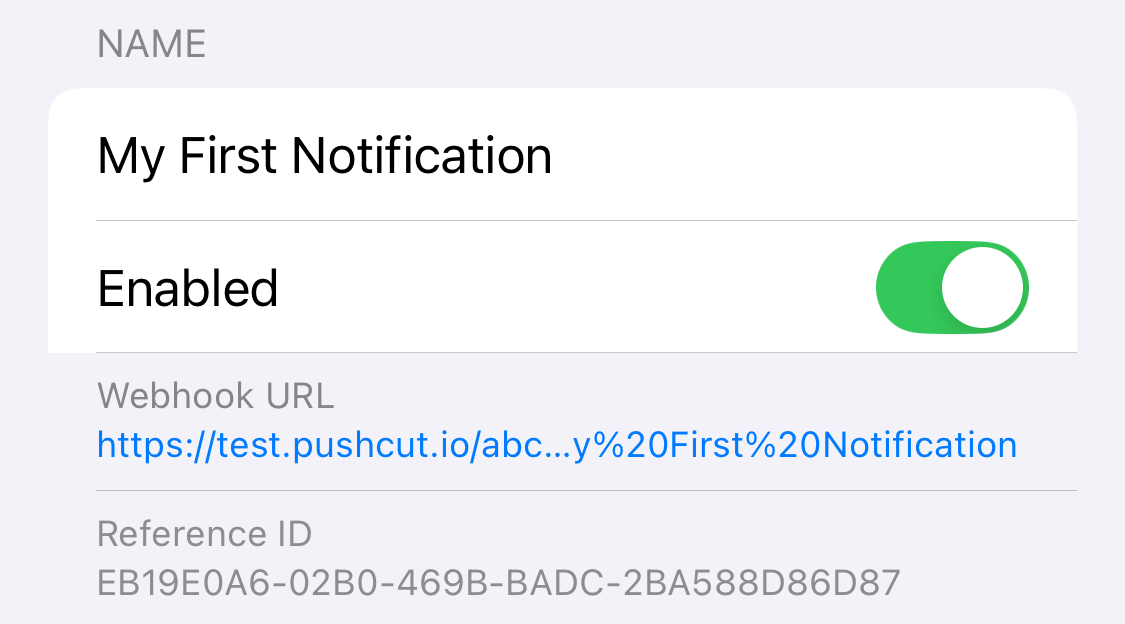
Reference IDs let you send a notification without relying on the name staying the same, allowing you to freely rename your notifications without breaking any automations.

You can use a Reference ID in place of the notification name in the webhook URL https://api.pushcut.io/[secret]/notifications/[reference-id].
You can enable display of Reference IDs by going to Settings -> Shortcuts and view the ID (tap to copy) by opening the notification definition.
More control with JSON
You can attach a JSON body to the POST request to dynamically adjust the notification. Dynamic titles, texts, images, and inputs require a Pro subscription. Passing JSON values does not change the defined notifications in your app, the information is only used for each individual push. JSON bodies work with both the API and the secret webhook.
Make sure to set the Content-Type to application/json and that correct quotes are used!
If you have the Smart Punctuation (iOS) or Smart Quotes (macOS) feature turned on, your quotes might look like „text“ or “text”.
This is not valid JSON and will not work. Make sure your quotes look like this: "text".
Here is a list of JSON keys that are supported - they are all optional. Any other key will be ignored.
| Key | Value | Type | |
|---|---|---|---|
| text | string that will be used as the notification body (instead of the defined one) | string | |
| title | string that will be used as the notification title (instead of the defined one) | string | |
| defaultAction | an action object describing the default action | Action object | |
| actions | a list of action objects that will be merged or added to the notification | array of Action objects | |
| sound | name of the sound that should be played when the notification is delivered (see list below) | string | |
| image | name or web URL of an image to be displayed with the notification | string | |
| imageData | base64-encoded image to be displayed with the notification (overrides image property) |
string | |
| input | value that is passed as input to any action triggered by this notification | string | |
| devices | a list of device names this notification should be sent to (see below) | array of strings | |
| isTimeSensitive | whether the notification should be marked as "Time-Sensitive" | boolean | string |
| delay | a string representing how long to way before sending the notification, e.g. 1h 5m 10s
|
string | |
| scheduleTimestamp | a unix timestamp in milliseconds of the date when the notification should be sent | string | |
| id | a custom identifier you can use to update or cancel this notification later | ||
| threadId | the "thread-id" to be used for grouping related notifications |
An Action object supports the following keys:
| Key | Value | Type |
|---|---|---|
| name | the name of the action (not used for default action, otherwise mandatory) | string |
| input | value that is passed as input for this action | string |
| keepNotification | when set to true, this action will not dismiss the notification (not valid for default action) | boolean |
| shortcut | the name of the shortcut this action should run | string |
| homekit | the name of a HomeKit scene this action should set (use "Home: Scene" for multiple homes) | string |
| runOnServer | when set to true, the shortcut or homekit action will be executed on the Automation Server | boolean |
| online | the name of an online automation this action should execute (use "Integration: Trigger", as listed in the app) | string |
| url | URL that this action should open | string |
| urlBackgroundOptions | configuration for background web requests (if set, the URL is used in an HTTP request instead of opened) | Options object |
A URL Background Options object supports the following keys:
| Key | Value | Type |
|---|---|---|
| httpMethod | a valid HTTP method (GET, PUT, POST) | string |
| httpContentType | an optional content type (like "application/json") | string |
| httpHeader | optional request header values (like [{"key": "API-Key", "value": "12345"}]
|
array of {key: string, value: string} objects |
| httpBody | an optional request body | string |
The Advanced section of the app‘s notification editor lets you toggle switches for Input Parameter, Dynamic Text, and
Dynamic Title.
While these are not required to enable JSON support, they are used to export an adjusted curl statement. If you tap Copy
URL > Copy curl after turning these switches on you will get an executable statement with a template JSON body that will
work on most systems.
Action information will be merged with the defined notification data from the app. You can add completely new actions to a notification (will be added after the defined ones), or add a value (eg: input parameter) to an action defined in the app. The name value is used to identify actions.
If you set an input value in your notification editor, it will only be used for local testing and to generate a template JSON request using the Copy curl feature.
You can set or override the notification sound by setting it to one of the following values:
vibrateOnlysystemsubtlequestionjobDoneproblemloudlasers
You can also set a custom sound's name after you have imported it in the app.
If you want to send specific notifications to selected devices only, pass a list of device names. You can see the names of devices linked to your account in the app's Account view.
Examples
{
  "title": "Rainy Day Ahead",
  "text": "Today will be 15°C and rainy. You have 6 meetings.",
  "devices": [
    "iPhoneXs"
  ]
}
{
 "text": "22 files ready.",
 "input": "/images/2019-04-16"
}
{
  "defaultAction": {
    "input": "/myFolder"
  },
  "actions": [
    {
      "name": "Add reminder",
      "shortcut": "Add Reminder",
      "input": "My new reminder"
    },
    {
      "name": "Open website",
      "url": "https://www.pushcut.io",
      "keepNotification": true
    }
  ]
}
{
  "actions": [
    {
      "name": "Close Garage",
      "homekit": "Garage Door Closed"
    },
    {
      "name": "Turn On Lights",
      "url": "https://maker.ifttt.com/trigger/lights_on/with/key/noTaReaLkEY",
      "urlBackgroundOptions": {
        "httpMethod": "GET"
      }
    }
  ]
}
{
  "sound": "lasers",
  "devices": [
    "iPad 11",
    "iPad 12.9"
  ]
}
Error codes
You might get one of the following error codes when something is wrong with the request:
| HTTP Code | Message | Reason |
|---|---|---|
| 404 Not Found | Invalid secret. | The secret does not belong to an active account. |
| 404 Not Found | Invalid notification name. | No notification is defined with this name. |
| 400 Bad Request | Specified device names invalid. | At least one of the device names was not found in your account. |
| 400 Bad Request | Bad Request | Something is wrong with the request, likely a malformed JSON body. |
| 500 Internal Server Error | An internal server error occurred. | Please try again, or contact us if this problem persists. |